Virtual Switches in Ezlo, yes you can

In the new Ezlo web user interface under Settings → Devices you cannot control your devices from this area, instead go to the Dashboard menu item.

Scenes are now called “Meshbots” go to that menu item you can create a new “local” rule (scene).

That is not true. The older Vera hubs are still being supported by the new Ezlo company.

They are just no longer being actively developed and improved in anyway. But still continue to work and function as they always did.

And the new Ezlo line of hubs will replace them eventually.

However I still run my old Vera Plus as my main controller for my house.

That’s not quite accurate.

You do need a plugin but its a plugin that Ezlo created themselves.

The help page you linked too mentions you have to run these two commands via SSH terminal, to install the plugin.

opkg update
opkg install firmware-plugins-test_plugin

Once you have done that, you then have to use the Online API tool to run further code commands, to create the virtual devices that you require.

So its not quite native out of the box experience and the lack of a web UI area for it, also makes it somewhat difficult for some people, as we are now reading about here.

Tom if you have a Windows PC and install Putty client we can talk you through how to install the required plugin and how to then create the virtual devices you want to add.

You will also need to know what IP address your Ezlo hub has from your router.

Let us help you by showing you exactly what you have to do.
First please tell us one by one what exactly you want to automate and the rules you want.
We will then show you step by step how to create these.

Also in the Add new Device page in the mobile app, that title heading in this screen shot is misleading. “Virtual Device”.

When you use that option, it looks to be for Ezlo VOI Voice Assistant virtual device. So it should be renamed as “Virtual Device - VOI”

(VOI still broken and none functioning btw).

There are different types of virtual devices on the system.

  1. Standard “traditional” Virtual Devices.

  2. Virtual Container - Hybrid Virtual devices based off various real devices properties.

  3. VOI virtual devices - Alexa or Google Home text command devices, on / off etc.

  4. WiFi Device Generator plugin- HTTP command based virtual devices, on / off etc.

And likely more types now in addition, with the likes of the new Sonoff plugin.

This thread is discussing number 1.

Ok we have a new feature request put in now with the devs, for this to be inbuilt into the default web UI.

For the virtual device plugin to be added to firmware out of the box and for a front end UI to be added into the web UI, likely under the existing “Virtual Containers” area.

I asked for this before in the past, but hopefully its back on their radar properly again now.

For us more advanced users its not really been a problem for us. But a front end easy to use UI would certainly assist others.

In the meantime we can talk anyone through creating virtual devices via the method we are currently using today, if they ask and can follow our instructions.

The only real missing part from my original how to guide is how to actually connect to the hubs terminal command line via putty. Everything else needed was already covered in there.

In the mean time here are some instructions on how to connect to the SSH Terminal using Putty client program.

Putty for Windows can be downloaded here you probably want the one called 64-bit x86.

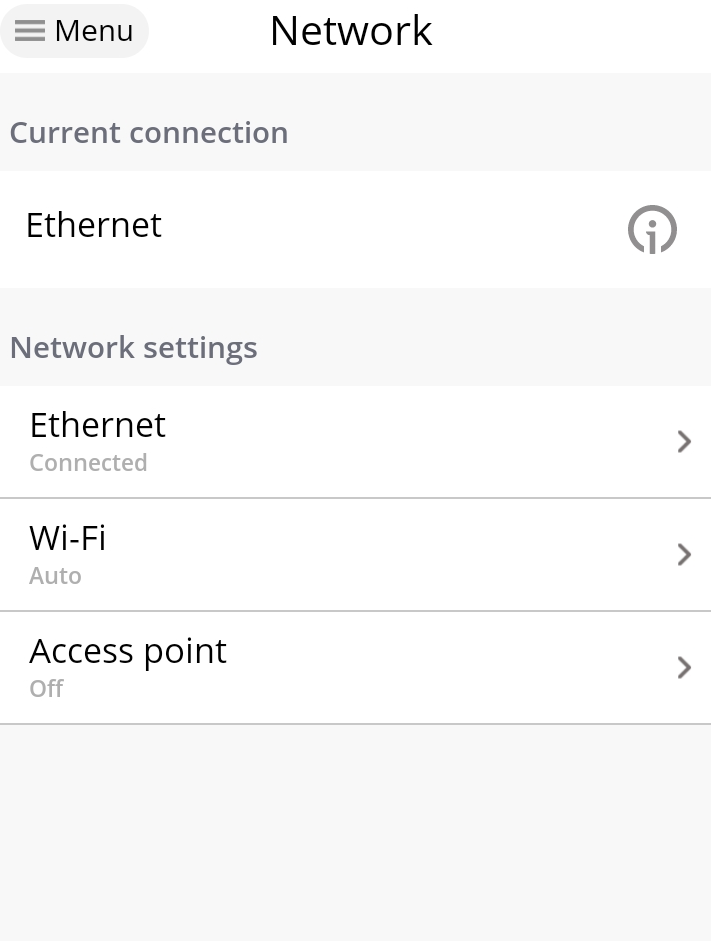
In the Vera mobile app go to Settings - Network from the menu.

Make a note of the Current Connection, Ethernet or WIFI etc. Mine is Ethernet so I select that from this page

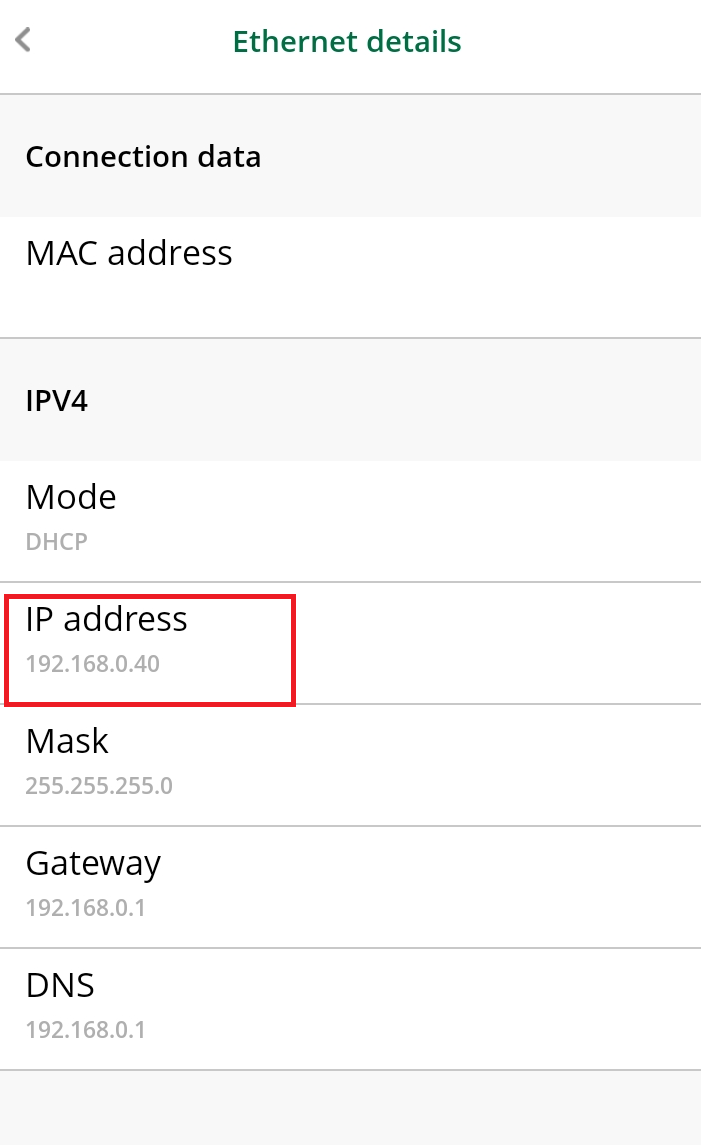
On the next page make a note of your Ezlo controllers IP address

Open the Putty client program you should of installed and create a connection

image

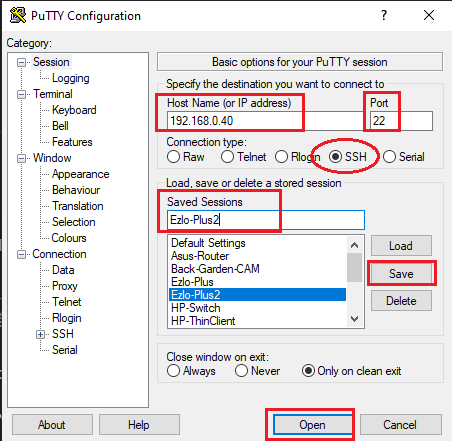
Enter the IP address of your Ezlo Hub the port number should be 22 and SSH should be selected.

You can also enter a name in to the “Saved Sessions” field, to save this connection session and then press the save button.

To actually connect press the Open button.

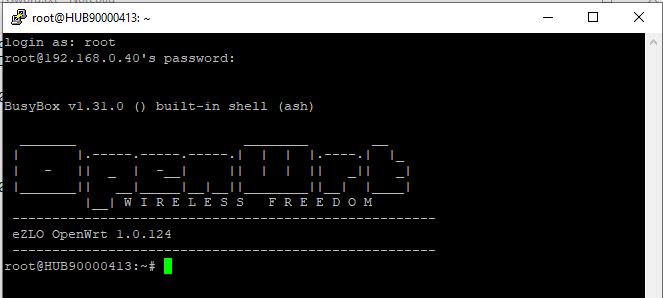
In the terminal window enter the user name “root” and the WIFI password from the sticker underneath your Ezlo controller.

image

Once logged in to the terminal you can issue the two commands to install the required virtual devices plugin.

opkg update
opkg install firmware-plugins-test_plugin
  • Reboot your hub to complete the plugin installation. Type ‘reboot’ at the Putty (or other client) window then hit ‘Enter’.

Now you need to use the Online API Tool and issue the code commands in there to start creating your virtual devices.

You can now follow the rest of the setup from the official guide here in the “Create your Virtual Switches” section.

Or you can use my unofficial updated guide here.

I loaded a virtual switch as I showed earlier in this thread. No SSH or putty. No loading plugins or the like.

I logged into my Ezlo from the Ezlo API Tool tool web page. Once logged into my device I ran a single command here:

{
 "method": "extensions.plugin.run",
 "id": "_ID_",
 "params": {
 "script": "HUB:test_plugin/scripts/generate_devices",
 "scriptParams": {
 "device_type": "plug_interior",
 "devices_count": 1
 }
 }
}

Then I closed the web page and went into Ezlo via the iPhone client and renamed the newly created virtual switch to a new name and I was done. No plugins loaded. Two steps 1) log in via the web page API, 2) paste the command above into the screen and run it. done.

I’ve tried this method several times, but have never been able to create a virtual device with it until now.

I would also like to integrate this function into the web interface. Even if that would work fine via the API, it’s still a bit cumbersome.

If at some point you can add devices through the web interface, I would put that functionality right there.

That method must be working then now to install the plugin via the Online API Tool.

Before I could never get that method to work which is why we had to use SSH instead.

EDIT: Oh your saying you never installed the plugin ? You must have done it at some point in the past or you would not be able to create any virtual devices.

EDIT 2:

In my original how to guide this was meant to be the command to use to install the plugin via the Online API Tool, but it never worked and why we had to use SSH terminal instead.

First we need to execute:

{
"method" : "hub.software.update.plan" ,
"id" : "_ID_" ,
"params" : {
"operation" : "install" ,
"type" : "plugin" ,
"id" : "test_plugin"
}
}

The result of the previous request should be inserted into this request:

{
"method" : "hub.software.update.execute" ,
"id" : "_ID_" ,
"params" : {
"actions" : [
<Result of previous command>
]
}
}

Might have to test it again now.

Its already going to happen now, its on their to do list, so we should see a front end UI for this in the future in the web UI.

I never installed the plugin. I just ran the commands to create the virtual device from the web API.

Maybe they added that plugin to the standard build of the product now? Or maybe my Ezlo Plus was B Stock and a prior owner loaded the plugin.

Regardless this long winded thread is proving the point best. You need to be able to create a virtual switch easily from the standard interface without OS login, SSH, PUTTY, strange API web pages, pasting cryptic code stubs, and so on. It should be as easy (even easier) than pairing a new ZWave device.

I would think adding this to the product would be a 30 minute exercise by a competent developer. Isn’t is just putting a nice GUI wrapper in front of the commands above?

What say you Ezlo? Throw the community a bone and knock this off and make virtual switch creation easy as pie.

p.s. just for fun I tried making a LUA script to create a VSwitch this but it didn’t work. I tried this:

os.execute(" {
“method”: “extensions.plugin.run”,
“id”: “ID”,
“params”: {
“script”: “HUB:test_plugin/scripts/generate_devices”,
“scriptParams”: {
“device_type”: “plug_interior”,
“devices_count”: 1
}
}
}
")

came back with error:

LuaModuleLoader: Couldn’t load a plugin’s script 'anonymous:631750c0d4e1dc12a267a68a: [string “anonymous:631750c0d4e1dc12a267a68a”]:1: unfinished string near ‘" {’

Couldn’t agree with you more on that !

That is a mystery then !

@curiousB

If you can be bothered and want to look, the test_plugin is located in this folder /opt/firmware/plugins

Screen shot from WinSCP:

image

I am 900 miles away now so not sure how to access remotely from afar. The api web page seems to only work when it is on the same LAN as Ezlo Plus. I do not have a VPN or other means to get past my router.

OK no worries mate.

I am not sure how to uninstall the test_plugin if I figure that out, I will try and create a virtual device with it not install just for laughs.

@curiousB the online API tool works regardless of you are in the same LAN or not. Please give it a try. Or our customer care can help you with that. @SaraV .

@Odysee we will add it to the UI and make it easy so you wont even need to struggle with installing a plugin. Its our highest priority now. Should be available in the next FW release. Which includes also other fixes and FW releases requires lots of regression testing so it may take little while but you will get it as soon as possible.

@curiousB the online API tool works regardless of you are in the same LAN or not. Please give it a try. Or our customer care can help you with that. @SaraV .

OK so I just tested it. I was logged into the API incorrectly. Once corrected I was able to create a virtual on/off switch by selecting custom command and pasting in the code below and running it. I’m 906 miles away and on wrong side of two firewalls. So I guess the API can work just fine across WAN connections.

{
“method”: “extensions.plugin.run”,
“id”: “ID”,
“params”: {
“script”: “HUB:test_plugin/scripts/generate_devices”,
“scriptParams”: {
“device_type”: “plug_interior”,
“devices_count”: 1
}
}
}

1 Like

@curiousB we’re glad you managed to create a virtual device. If you happen to have more questions about the use of the API or questions regarding the test plugin for virtual devices, you can ping me/mention me. I’ll try to help you out with as many resources as possible!

As promised the devs have now added a front end UI in the web interface for more easily creating virtual devices on the controller. See here for details.

3 Likes