Hi everyone,
Our new plugin for Ezlo controllers, the Google Nest plugin is now available on the marketplace. You can copy it to your controller and start using it immediately.
The Nest plugin enables you to integrate your Google Nest thermostats into the Ezlo ecosystem and create automations that include your Nest thermostats via MeshBot automations, as well as visualize its state and control it with the dashboard.
In order to start, you first need to go through this manual found in the Google documentation and acquire four credentials: Device Access Project ID, Client ID, Authorization Code, and Client Secret.
Once you follow the steps in the linked guide and create your project, go into the details of the project and note down the Project ID.
Then go to https://console.cloud.google.com, and from the left hand side navigation menu, go to APIs & Services → Credentials. Click on the name of your OAuth2 client.
In the screen that opens up, note down the Client ID and Client Secret.
Once you do that and note these down, the next step is to follow the “Link your account” section from the Google documentation and acquire the authorization code.
Once you do that, the URL of the webpage that opens up contains your authorization code. As marked on the screenshot, that’s the part between code= and &scope. Please also note down the authorization code in a safe place.
You now have all the credentials you need to integrate your Google Nest thermostat into your Ezlo controller.
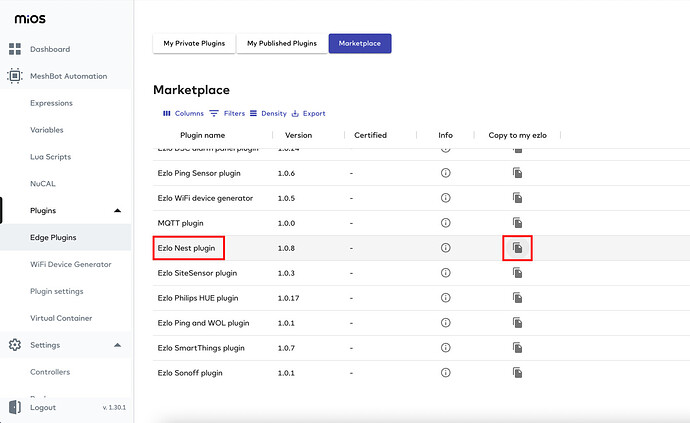
What follows is copying the plugin to your Ezlo account from the plugin marketplace and installing it on your controller. To do that, navigate to the Edge Plugins menu on EZlogic, then to the Marketplace. Click the “Copy to my Ezlo” button for the Nest plugin. Once you’re taken back to the “My Private Plugins” tab which now includes the Nest plugin, click the Manage Installations button and click the Install button next to your controller.
Once you do that and you see the success message, click the Configure button.
Give your Nest thermostat a name, i.e., “Nest Thermostat”, then fill in the rest of the fields with the values you noted down earlier. Click Save New Configuration. You will see a success message that your configuration has been saved successfully.
Your Nest thermostat will now have been added to your Ezlo controller, and you can find it in your devices list. You are now ready to create MeshBot automations that include your Nest thermostat, and you can see its current state visualized on the Dashboard.


