Installing Sonos Plugin 2.0 (development/pre-release) for Azure TTS access

.
.
.
.
.
.

AS OF 18-May-2020 THESE INSTRUCTIONS DO NOT APPLY. DO NOT RUN THIS PROCEDURE.
IF YOU WANT TO INSTALL THE SONOS PLUGIN, PLEASE DO SO THROUGH THE VERA PLUGIN MARKETPLACE (OR ALTAPP STORE).

.

.

.

.

.

These instructions are for users who want access to the Azure TTS engine support in the upcoming Sonos plugin 2.0 release. Version 2.0 is currently a work in progress, so be aware that you are installing pre-release software that has been through considerable revision with minimal testing.

READ THESE INSTRUCTIONS THROUGH FIRST, THEN FOLLOW THEM TO THE LETTER. If you don’t run this procedure correctly, you risk destroying your existing Sonos devices, and if that happens, they will be recreated, but with new device numbers–your existing scenes, Lua, Reactor, PLEG, etc. will need to be updated. If you do this procedure correctly, it will preserve the existing devices and their numbering, no additional work required.

DO NOT INSTALL THIS VERSION FOR ANY REASON OTHER THAN ACCESS TO AZURE TTS AT THIS TIME

DO NOT INSTALL THIS VERSION IF YOU DO NOT WANT PRE-RELEASE LEVEL SOFTWARE ON YOUR VERA SYSTEM

  1. Run the following Lua in Apps > Develop apps > Test Luup code. This code will disconnect your existing Sonos devices from the installed plugin. The devices will not be deleted, and they will still operate normally. By decoupling them from the plugin here, when you later delete the plugin (step 2), the devices will not be automatically deleted with it–we’re preserving your existing devices (and thus preserving their device numbers).
    for n,d in pairs( luup.devices ) do
        if d.device_type == "urn:schemas-micasaverde-com:device:Sonos:1" then
            luup.attr_set( "plugin", "", n )
        end
    end
    luup.reload()
    
  2. When Luup finishes reloading, go to Apps > My apps and uninstall the existing Sonos plugin (if it’s not listed there, no problem, just move on).
  3. Reload luup. I usually just to go Apps > Develop apps > Test Luup code and run luup.reload()
  4. Open the Github develop branch repository: GitHub - toggledbits/Sonos-Vera at develop
  5. Click the green “Clone or download” button and choose “Download ZIP”
  6. Save the ZIP file.
  7. Unzip the ZIP file
  8. In the Vera UI, go to Apps > Develop apps > Luup files
  9. Multi-select the files (not folders–ignore any folders) you unzipped and drag them as a group to the “Upload” button. Also skip the Sonos_chime.mp3 file.
  10. When the upload completes, Luup will reload.
  11. If you are upgrading from a prior spin of 2.0, skip now to step 14. If and only if you are installing 2.0 for the first time, then when the reload completes, create the Sonos System master device:
    a. Go to Apps > Develop apps > Create device
    b. In the “Description” field, enter Sonos System
    c. In the “UPnP Device Filename” field, enter D_SonosSystem1.xml
    d. In the “UPnP Implementation Filename” field, enter I_SonosSystem1.xml
    e. You may choose a room assignment if you wish.
    f. Click “Create device”
  12. Go to Apps > Develop apps > Test luup code and reload luup by running luup.reload()
  13. Wait about five minutes. Your Vera may reload several times during this time.
  14. Hard refresh your browser. Do not skip this step. You should now see your Sonos devices, and the Sonos System master device should report the number of zone players it is managing.

If anything appears out of whack and it doesn’t resolve in 5-10 minutes, repeat steps 12-14. Sometimes it takes a couple of reloads and hard refreshes to get everything sorted.

The new Sonos System master device will adopt your previous/existing Sonos devices as its children (with the same device number they’ve always had), and create new child devices for any other zone players discovered on the network. There is usually no need to run discovery manually in this version.

Install check: The “Settings” tab of the Sonos master device should show 20080.1005 (or higher)

Configuration of TTS is done on the Sonos System master device. You will need to register for an Azure account and set up a subscription and cognitive services. Create a subscription here: https://azure.microsoft.com/free/

TO CREATE THE COGNITIVE SERVICES RESOURCE (AFTER CREATING A SUBSCRIPTION):

  1. Go to: Microsoft Azure
  2. Enter a name for the resource. “Vera Sonos TTS” for example.
  3. Select the subscription (you’ll probably only have one to choose from)
  4. Location: choose the one that appears geographically nearest to you.
  5. Pricing tier, choose “S0” or whatever is available/cheapest.
  6. Resource group: choose an existing or create a new one. Doesn’t much matter what it is if this is all you’ll be using Azure for.
  7. Check the “OK/agree” box and then click “Create”.
  8. Wait for resource to be created. When it’s finished, click “Go to resource”.
  9. Enter the key shown into the Azure TTS config on the Sonos plugin.
  10. Look at the endpoint URL; it should be <region>.api.cognitive.microsoft.com
 choose the region in the Azure TTS config for the Sonos plugin that matches the region shown.
2 Likes

In this particular case, there are a lot of interim reloads that are necessary, but we don’t care about the UI effects; the ones at the end are the important ones. But as a practice, you are wise to just make it a habit. It will save you much confusion in future.

GOOD NEWS! If (and this can be a huuuge IF) you follow @rigpapa’s sage advice in the How-To above – most importantly, including the Azure Subscription steps for getting a valid API key – then Sonos 2.0 is good to go.

Having just spent nigh on 6 hours enabling my own Vera Plus to perform TTS for the very first time (ever!), I can share some brief pointers:

  1. Resist the temptation to enter values into any of the newly created Sonos System’s variables or Settings page, other than the above-mentioned Key and Region. Tweak all you want after things are working.

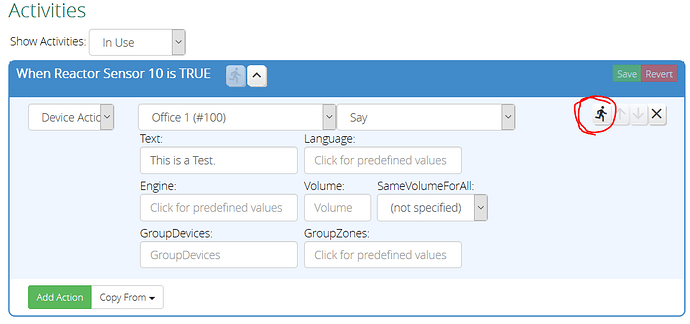
  2. If things don’t work according to plan (and you’re certain your Microsoft-issued Key relates to the exact same ‘endpoint’ shown in the How-To above), turn on ‘Debug Logs’ [‘TTS Engines’ and ‘Plugin’ should be checked] on the master Sonos System’s SETTINGS page, and trigger a ‘Say’ command. (For this, I suggest a Reactor scene Activity, since there’s no more SAY button for testing purposes.)

  3. Did I mention to follow all the provided steps very closely? :smiley:

  4. Don’t forget to restart Luup with a luup.reload() command from the Apps > Develop apps > Test Luup code box if you’re not getting any audio at first. Also turn off any debugging from Step 2, and click SAVE.

GOOD LUCK and happy TTS’ing!

  • Libra
1 Like

Some immediate caveats to be aware of:

  1. Speech is sometimes truncated, such that the final syllable of the intended phrase gets omitted, though this seems to happen most often to the first time a specific phrase is uttered. (Buffering ftw?)

  2. Every TTS event is preceded by an audible ‘bing’ tone, which I believe(?) can be modified to suit. (However, I don’t know how yet.) UPDATE: See next reply.

  3. IMHO, the voice quality of Jessa/Neural is superior to that of Jessa/Standard for en-US usage. #ymmv

I just fixed this! Will be up on Github before the end of the night.

It is configurable:

  • On the Say action, you can set UseChime to 0 to disable the chime on a per-action basis;
  • System-wide, you can set the TTSChime state variable on the Sonos master device. It is a two- or three-element comma-separated list of filename, duration, and (optional) volume. The filename should be an MP3 file (any specs compatible/playable with Sonos) uploaded to /etc/cmh-ludl/. The duration is the play duration of the file in whole seconds, rounded up. The volume (0-100) is optional–if not specified, the chime is played at the action’s directed volume; otherwise, the chime is always played at the specified configuration volume. If this variable is set to none or any non-existent filename, no chime will sound (system wide).
1 Like

As always, thanks Patrick for your dedication to vera plugins!!!

I am unclear how to get the TTS to trigger after the above setup.

I added an Activity to Reactor, Device Action > Sonos System > Choose Action > But there is no say command.

Also tried Activity > Device Action > Individual Sonos Speaker > Say > added Text in Say field > left all others blank.

Didn’t work.

Are we supposed to specify anything else?

The language field populates with the RV voices.

If I click the “Try this Action” Button, should it work?

Run a couple of “Say” attempts, then look at the bottom of your LuaUPnP log file for those actions, and see what follows. Most problem messages will be in yellow.

Found this:

luup_log:99: Sonos: Some engines used with the TTS module require that ‘Enable Unsafe Lua’ (under ‘Users & Account Info > Security’) be enabled in your controller settings.

Enabling this made it work.

2 Likes

I understand this is a beta and still in development, It appears something went wrong in my setup because now I have about 11 extra sonos devices on my vera.

Would it be best for me to delete the app and do a fresh install?

TIA

Can you go into one of the errant devices, to Advanced > Params, find the “altid” field, and post it back here in a reply?

Here ya go.

RINCON_B8E937F97DF801400

OK. Can you post the contents of the ZoneGroupState variable from one of your correct Sonos devices? Please copy it from the “Edit” dialog so that it’s the correct/most-current. Thx!

its:

<ZoneGroupState><ZoneGroups><ZoneGroup Coordinator="RINCON_B8E9372AA15001400" ID="RINCON_B8E9372AA15001400:1064363175"><ZoneGroupMember UUID="RINCON_B8E9372AA15001400" Location="http://192.168.0.196:1400/xml/device_description.xml" ZoneName="Living Room" Icon="x-rincon-roomicon:living" Configuration="1" SoftwareVersion="54.2-72160" SWGen="1" MinCompatibleVersion="53.0-00000" LegacyCompatibleVersion="36.0-00000" ChannelMapSet="RINCON_B8E9372AA15001400:LF,LF;RINCON_B8E937F97DF801400:RF,RF" BootSeq="46" TVConfigurationError="0" HdmiCecAvailable="0" WirelessMode="0" WirelessLeafOnly="0" HasConfiguredSSID="1" ChannelFreq="2437" BehindWifiExtender="0" WifiEnabled="1" Orientation="0" RoomCalibrationState="4" SecureRegState="3" VoiceConfigState="0" MicEnabled="0" AirPlayEnabled="0" IdleState="1" MoreInfo=""></ZoneGroupMember><ZoneGroupMember UUID="RINCON_B8E937BCFC9C01400" Location="http://192.168.0.168:1400/xml/device_description.xml" ZoneName="Kitchen" Icon="x-rincon-roomicon:kitchen" Configuration="1" SoftwareVersion="54.2-72160" SWGen="1" MinCompatibleVersion="53.0-00000" LegacyCompatibleVersion="36.0-00000" BootSeq="868" TVConfigurationError="0" HdmiCecAvailable="0" WirelessMode="0" WirelessLeafOnly="0" HasConfiguredSSID="1" ChannelFreq="2437" BehindWifiExtender="0" WifiEnabled="1" Orientation="0" RoomCalibrationState="4" SecureRegState="3" VoiceConfigState="0" MicEnabled="0" AirPlayEnabled="0" IdleState="1" MoreInfo=""></ZoneGroupMember><ZoneGroupMember UUID="RINCON_7828CA11F28E01400" Location="http://192.168.0.137:1400/xml/device_description.xml" ZoneName="Bedroom" Icon="x-rincon-roomicon:bedroom" Configuration="1" SoftwareVersion="54.2-72160" SWGen="1" MinCompatibleVersion="53.0-00000" LegacyCompatibleVersion="36.0-00000" BootSeq="124" TVConfigurationError="0" HdmiCecAvailable="0" WirelessMode="0" WirelessLeafOnly="0" HasConfiguredSSID="1" ChannelFreq="2437" BehindWifiExtender="0" WifiEnabled="1" Orientation="0" RoomCalibrationState="4" SecureRegState="3" VoiceConfigState="2" MicEnabled="1" AirPlayEnabled="1" IdleState="1" MoreInfo=""></ZoneGroupMember><ZoneGroupMember UUID="RINCON_B8E937F97DF801400" Location="http://192.168.0.146:1400/xml/device_description.xml" ZoneName="Living Room" Icon="x-rincon-roomicon:living" Configuration="1" Invisible="1" SoftwareVersion="54.2-72160" SWGen="1" MinCompatibleVersion="53.0-00000" LegacyCompatibleVersion="36.0-00000" ChannelMapSet="RINCON_B8E9372AA15001400:LF,LF;RINCON_B8E937F97DF801400:RF,RF" BootSeq="50" TVConfigurationError="0" HdmiCecAvailable="0" WirelessMode="0" WirelessLeafOnly="0" HasConfiguredSSID="1" ChannelFreq="2437" BehindWifiExtender="0" WifiEnabled="1" Orientation="0" RoomCalibrationState="5" SecureRegState="3" VoiceConfigState="0" MicEnabled="0" AirPlayEnabled="0" IdleState="1" MoreInfo=""></ZoneGroupMember></ZoneGroup><ZoneGroup Coordinator="RINCON_7828CA71A2B601400" ID="RINCON_7828CA71A2B601400:3565541045"><ZoneGroupMember UUID="RINCON_7828CA71A2B601400" Location="http://192.168.0.106:1400/xml/device_description.xml" ZoneName="Boost" Icon="x-rincon-roomicon:viper" Configuration="1" Invisible="1" IsZoneBridge="1" SoftwareVersion="54.2-72160" SWGen="1" MinCompatibleVersion="53.0-00000" LegacyCompatibleVersion="36.0-00000" BootSeq="17" TVConfigurationError="0" HdmiCecAvailable="0" WirelessMode="0" WirelessLeafOnly="0" HasConfiguredSSID="1" ChannelFreq="2437" BehindWifiExtender="0" WifiEnabled="1" Orientation="-1" RoomCalibrationState="0" SecureRegState="3" VoiceConfigState="0" MicEnabled="0" AirPlayEnabled="0" IdleState="1" MoreInfo=""></ZoneGroupMember></ZoneGroup></ZoneGroups></ZoneGroupState>

OK, sit tight, I’m on it


Will do and thank you for your help!

OK, please update to the latest 2.0 by running steps 4-10 of the head post, and then step 14 to finish (the hard refresh of the browser).

This should repair the incorrect creation of duplicate devices. With a tailwind, it might also remove your duplicate devices. If it does not, don’t panic, just let me know either way.

Okay, I did an instructed and the duplicates are still there. I did do a backup of the device before I started messing around with it today so I can always restore it and try again if needed or if it is helping out I don’t mind trouble shooting the issue either.

Can you confirm the version number displayed on the bottom of the Sonos master device’s Settings page?

Sonos Plugin version 2.0develop-20053.1240

OK. No need to restore from backup or anything like that. The dups are annoying but harmless. You can just delete them manually. Just take care which you delete–you don’t want to delete your originals if they are mentioned in scenes, Lua, Reactor, PLEG, etc. You may need to check device numbers (big green number on the Advanced tab of each device).

Actually no
 check that
 that’s the wrong revision number. Are you sure you uploaded all the files?